Grading student work well is hard, and grading the reasoning behind it is harder still. A correct answer on its own rarely tells you whether the student understood what they did, and a written explanation is slow to read at scale. I’ve been exploring whether a short, structured conversation with an LLM — one that asks the student to walk through their reasoning — can sit alongside the artifact they submit and give instructors a useful second signal. This tutorial walks through the prototype I built: a small open-source app that lets students upload their work, chat briefly with an AI, and produces advisory per-dimension grades for an instructor to review and override.
Repository: github.com/benrosche/ai-grader-public
This tutorial walks you through using AI Grader end-to-end with a small example: a matrix-multiplication problem set. By the end you will have:
- a working local instance, pre-loaded with two example tasks you can play with;
- a clear picture of what files define a task and how to write your own;
- pointers for how to deploy it on Railway when you’re ready to put it in front of students.
The example we build is shipped as a runnable task in the public repo — config/tasks/matmul/ — so you can run it immediately without writing any files yourself. Alongside it lives a more elaborate poster-presentation task as a second reference point. The walkthrough then shows you how each piece works so you can adapt it to your own course.
One thing to note about the repo layout before you start: the public repo ships the code and the two example task configs, but it is intentionally empty of student data — no saved conversations, no uploaded artifacts, no graded sessions. That is by design. If you plan to use AI Grader with real students, the recommended setup is to fork the public repo into a private repo of your own, deploy from there, and let your private instance accumulate the actual grading data. The public repo is the template; your private fork is where the teaching happens. The README’s “Forking this repo” section walks through the git remotes you’ll want.
Prerequisites
- Python 3.11 or newer.
- An OpenAI API key. You can create one at platform.openai.com. The example task is cheap to run (a few cents per session at current pricing).
- Git.
- Optional for the deployment section: a Railway account. Railway has a free trial that’s enough to follow along.
The example task
Students get a printed (or shared digital) problem set with a handful of matrix multiplication problems. Here are four you can use as-is — copy them into a Word document or LaTeX file and hand it out:
1.  A = [[2, 1],          B = [[3, 0],
         [0, 4]]                [1, 2]]
    Compute A · B.

2.  A = [[1, 2, 3]],      B = [[4],
                                [5],
                                [6]]
    Compute A · B.

3.  A = [[2, 0, 1],       B = [[1, 1],
         [1, 3, 2]]             [0, 2],
                                [1, 0]]
    Compute A · B.

4.  A = [[1, 2],          B = [[5, 6],
         [3, 4]]                [7, 8]]
    Compute B · A.
Students fill in the answers by hand, take a photo (or scan to PDF), and upload it. They then have a short conversation with an AI tutor that asks them to walk through one of the problems — which one they pick is up to them. The AI judge produces two advisory grades — Correctness (from the upload) and Reasoning (from the conversation) — which you, the instructor, review and overlay with your own marks in the admin UI.
The whole student-facing experience is designed to take around five minutes.
Anatomy of a task folder
Every task is a folder under config/tasks/ containing exactly four files. Here’s what they do, using matmul as the example.
task.yml — the metadata
title: Matrix Multiplication Problem Set
artifact_label: Solved problem set
upload_required: true
allowed_uploads:
  - extension: .pdf
    mime_type: application/pdf
  - extension: .png
    mime_type: image/png
  - extension: .jpg
    mime_type: image/jpeg
  - extension: .jpeg
    mime_type: image/jpeg
categories:
  - Correctness
  - Reasoning
min_chat_seconds: 90
min_student_replies: 4
titleis shown to students and on the admin page.artifact_labellabels the upload widget the student sees (“Solved problem set” in this case).upload_required: trueblocks the chat from starting until something is uploaded. Set it tofalsefor chat-only tasks.allowed_uploadswhitelists file types. Students get an error if they upload anything else.categoriesare the grading dimensions. The AI returns one band + score per category.min_chat_secondsandmin_student_repliesare floors: the student can’t submit until both are met. For this short task we use 90 seconds and 4 replies. For the richer poster task we use 300 seconds and 10 replies.
conversation-guidance.md — the AI’s instructions
This file is concatenated into the system prompt for the conversation model. The first thing it must contain is a fenced block tagged first-message. The text inside is sent verbatim as the assistant’s opening turn — no LLM call is made for the first message.
From config/tasks/matmul/conversation-guidance.md:
```first-message
Hi! Thanks for uploading your problem set. I'd like to hear how you
solved one of the problems. Pick whichever one you'd like to walk me
through, tell me which problem you chose, and what answer you got for
the product matrix.
```
The rest of the file tells the AI what persona to play, what to cover, how to pace itself, and what not to do. The matmul guide:
- gives the AI a friendly-TA persona;
- defines three things to cover (the answer, how one entry was computed, one conceptual check);
- caps the conversation at roughly four student turns;
- forbids the AI from revealing grades, lecturing, or solving the problem for the student.
The full file is short — read it for the structure, then write your own task’s guide the same way. The poster task’s guide at config/tasks/poster/conversation-guidance.md is a longer, more elaborate example with seven required areas.
grading-guidance.md — the rubric
After the student finishes the chat, a separate judge model gets the upload, the full transcript, the category names from task.yml, and this file. It returns strict JSON: one band + score + evidence + concerns line per category, plus an overall review status.
config/tasks/matmul/grading-guidance.md has:
- a review status rule (
Review (low confidence)/OK (medium confidence)/OK (high confidence)); - an answer key with the correct product for each of the four problems, plus a note about the most common mistake on problem 4. The judge is told to use these as ground truth rather than recomputing the products itself;
- a rubric for Correctness that grades the upload, with four performance bands (Exemplary 90-100, Proficient 80-89, Developing 70-79, Unacceptable <70);
- a rubric for Reasoning that grades the transcript, with the same four bands;
- a short note on how to score the two independently (e.g., correct answers + bad explanation → high Correctness, low Reasoning).
The four bands are conventional but not required — you can rename them in the rubric. The judge will use whatever names you provide, but always returns a numeric 0-100 score alongside.
About the answer key: including one is optional but useful whenever there is a well-defined right answer (math problem sets, factual questions, code with known expected output). It removes a source of error — the judge no longer has to compute the answer itself, which large models are not always reliable at. For tasks where “correctness” is a matter of judgment rather than a fixed answer (essays, posters, open-ended explanations), you can skip the answer-key section and let the rubric carry all the grading signal — see config/tasks/poster/grading-guidance.md for an example.
student_codes.csv — the roster
config/tasks/matmul/student_codes.csv is the access-control list. A student must enter a code from this file to start a session.
code,student_name,student_id
matmul-001,Student One,
matmul-002,Student Two,
matmul-003,Student Three,
matmul-004,Student Four,
matmul-005,Student Five,
Required columns: code, student_name. Optional: student_id, attempt_limit (alias: tries_allowed), attempts_taken (alias: tries_taken). Codes must be unique across all tasks in the repo (the app rejects startup if there’s a clash).
For real classes, replace the placeholder names with your roster. The codes themselves are arbitrary — pick anything unguessable. A short prefix per task (matmul-, poster-) helps you spot which task a code belongs to.
Run it locally
Clone the repo and install dependencies:
git clone https://github.com/benrosche/ai-grader-public.git
cd ai-grader-public
python -m venv .venv
.venv/Scripts/activate          # Windows; macOS/Linux: source .venv/bin/activate
pip install -r requirements.txt
Create a .env file at the repo root:
OPENAI_API_KEY=sk-...
ADMIN_PASSWORD=change-this-password
SESSION_SECRET=change-this-random-string
DATA_DIR=data
Start the app:
uvicorn app.main:app --reload
On the very first launch the app copies each config/tasks/<id>/ folder into data/<id>/ (the seeding logic lives in app/settings.py). After that, data/<id>/ is the canonical location for everything about a task — its config files, the uploaded artifacts, the saved transcripts, and the ai_marks.csv of grades. The in-repo config/tasks/ only matters as the seed for tasks that don’t exist yet in data/.
This is worth pausing on: edits you make in the admin UI write to data/<id>/, not to config/tasks/<id>/. If you want a fresh task to live in source control, copy it from data/<id>/ back to config/tasks/<id>/ and commit.
Walk through one student session
Open http://127.0.0.1:8000 in your browser. You’ll see a code entry form.
- Enter code
matmul-001. You should land on the matmul task page. - Upload any small PDF or image — for a smoke test, even a screenshot works.
- Have the conversation. The AI opens with the scripted message asking you to pick a problem. Tell it which one and what answer you got, then walk through how you computed one entry.
- Submit. After at least 90 seconds and four of your replies, the submit button activates.
When you submit, three things happen on disk under data/matmul/:
- a row per dimension appended to
data/matmul/ai_marks.csv; - a JSON transcript saved to
data/matmul/conversations/<student-code>_attempt-1_<timestamp>_<id>.json; - the uploaded file preserved in
data/matmul/uploads/.
The student sees a confirmation screen but no grade — by design, the AI’s marks are advisory and never shown to students directly.
Review as instructor
Visit http://127.0.0.1:8000/admin. Basic-auth credentials: username admin, password from your .env.
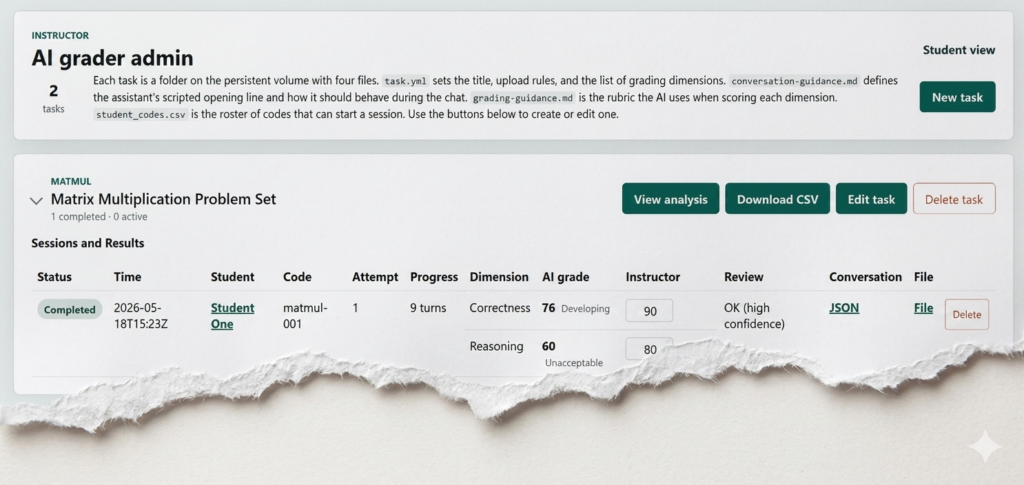
The admin landing page lists every task. Click into Matrix Multiplication Problem Set and you’ll see one row per (session × dimension). For our test session, that’s two rows: one for Correctness, one for Reasoning. Each row shows:
- the student code and name;
- the AI’s band, score, evidence line, and concerns line;
- an empty Instructor score field — click and type to enter your own mark. It auto-saves as you type. Your number can agree with the AI’s or override it; both end up in the CSV.
The transcript and uploaded artifact open side-by-side from the same page, so you can read the chat while looking at what the student submitted.
The Analysis link at the top of each task’s admin page renders a live overview: roster coverage (who has submitted, who hasn’t), AI-vs-instructor scatter and signed-diff plots once you’ve graded some sessions, and per-student summaries with collapsible transcripts. Useful for end-of-term sanity checks.
There’s also a CSV export button if you want the raw grades for your gradebook.
Edit the task from the admin UI
Browse to http://127.0.0.1:8000/admin/task/matmul/edit. You’ll see all four task files in raw editors. Change the title from “Matrix Multiplication Problem Set” to “Matrix Multiplication Quiz” and save. The change is validated (invalid YAML or rubrics get rejected and the previous file is restored) and then written to data/matmul/task.yml.
Refresh the student-facing page at / and you’ll see the new title.
To create a new task from scratch, use New task on the admin landing page. The editor pre-fills a working template you can adapt.
Deploy on Railway
Railway can build and run this repo directly from GitHub. The deployment is fast and the configuration is minimal.
- Push your repo to GitHub. If you plan to use this with real students, push to a private repo — see the README’s “Forking this repo” section for why and how.
- Create a Railway project from the repo. Go to railway.com/new, choose “Deploy from GitHub repo”, and pick your repo. Railway will build using the included Procfile.
- Attach a persistent volume and mount it at
/app/data/. This is the most important step. Without a volume, every redeploy wipes the conversations, uploads, and any admin edits you made to task files. With a volume mounted at/app/data/, all of that survives. -
Set environment variables in the Railway dashboard:
Variable Required? Notes OPENAI_API_KEYyes Your OpenAI key. ADMIN_PASSWORDyes Password for the /adminbasic-auth prompt.SESSION_SECRETyes Any long random string — used to sign session cookies. OPENAI_CHAT_MODELno Defaults to the chat model in app/settings.py; override to try a different one. OPENAI_JUDGE_MODELno Same idea for the judge. MAX_ATTEMPTS_PER_STUDENTno Defaults to 2. See app/settings.py for the full list of overrideable defaults (upload size limits, idle-session timeouts, etc.).
- Deploy. Railway builds and starts the service. On first boot the app sees an empty volume and seeds
data/matmul/anddata/poster/fromconfig/tasks/matmul/andconfig/tasks/poster/. From the second boot onward the seed is only used for new tasks (folders that don’t yet exist indata/), so you can safely edit existing tasks through the admin UI without worrying about a redeploy reverting your changes.
Open the Railway-provided URL, log in to /admin, and you’re running.
Optional: nightly GitHub sync
The repo ships a workflow at .github/workflows/sync-railway-volume.yml that runs nightly, SSHes into your Railway service, and commits the entire volume back into the data/ folder of your repo. You get a git-backed audit trail of every grading session and admin edit.
To use it, set two GitHub secrets on your private repo: RAILWAY_API_TOKEN (a Railway CLI token) and RAILWAY_SSH_PRIVATE_KEY (an SSH key registered with the Railway service). Update the PROJECT_ID, ENVIRONMENT_ID, and SERVICE_ID env vars at the top of the workflow file to match your Railway project, and you’re done. The workflow only commits when something actually changed, so quiet days produce no commits.
Important: because this workflow commits real student data (names, transcripts, uploaded files) to git history, only run it on a private repo. Do not enable it on a fork of the public repo.